
Two things trip up most Canva designs at print: no bleed, and the wrong colour setup. Both take a few minutes to fix. Here’s how.
What is bleed?
When we cut your print to size, the blade can land 1–2mm off. Bleed is a little extra background you extend past the cut line, so a slight shift never leaves a thin white strip along the edge. At ExpressPrint that’s 2mm on every side.
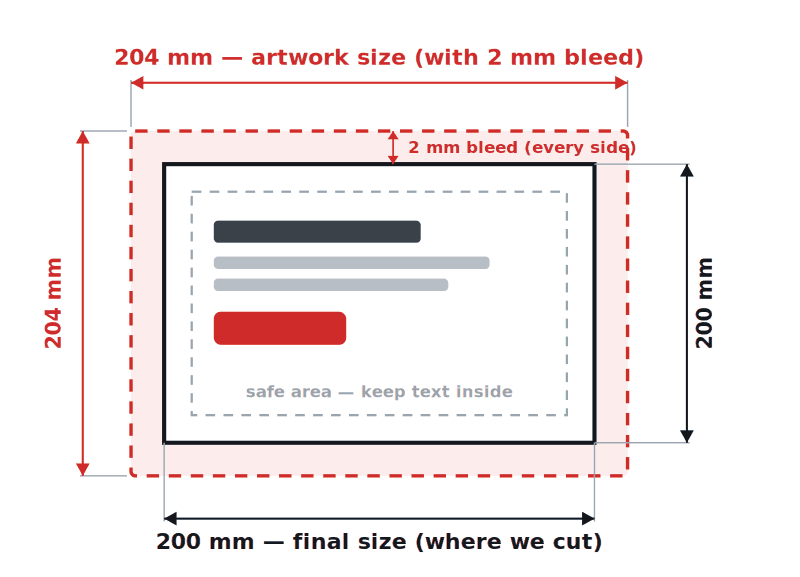
1. Set your size — with the bleed built in
The rule: artwork = final size + 2mm on every side. So a 200 × 200mm print needs a 204 × 204mm file. Then push your background, photos and colour blocks right to the edge.
On Canva Pro: use Resize → Custom size and enter 204 × 204mm.
On the free plan (you can’t resize a design): start a bigger canvas such as A4, draw a rectangle exactly 204 × 204mm, and keep your whole design inside it. We trim it back to 200 × 200mm.
2. Export as a print PDF
Go to Share → Download and set File type to PDF Print (not PDF Standard, PNG or JPG), then download.
Colour (CMYK vs RGB). Screens are RGB, printing is CMYK, so colours can shift a little — a bright blue can look slightly purple. On Canva Pro, set the colour profile to CMYK. On the free plan you’ll only have RGB; that’s fine to send.
Don’t add bleed twice. If you already made your canvas 204 × 204mm, do not also tick “Crop marks and bleed” on export — Canva adds its own bleed on top and your trim lines end up in the wrong place. Build the bleed in yourself or let Canva do it — never both.
3. Send it to us
Upload your PDF at checkout — files up to 20MB. Larger than that? Place your order first, then send the file by WeTransfer and we’ll match it to your order. Every order includes a free file check before we print.


